Sometimes the user doesn’t want to look on the toolbar for an action.
Consider putting a button in the actual layout.
Design your button

It is important to set the minimum size for it to be visible in the layout ( in my expereience)
![]()
In the control code behind I have
 public partial class MyButtonControl : XtraUserControl
    {
        public MyButtonControl()
        {
            InitializeComponent();
        }

        public event Action ButtonPressed = delegate { };

        private void simpleButton1_Click(object sender, EventArgs e)
        {
            ButtonPressed();
        }

        public void SetButtonPressed(Action myButtonButtonClicked)
        {
            ButtonPressed = myButtonButtonClicked;
        }
    }
In the editor I have
   [PropertyEditor(typeof(MyButton), true)]
    public class MyButtonEditor : WinPropertyEditor
    {
        public MyButtonEditor(Type objectType, IModelMemberViewItem model) : base(objectType, model)
        {
        }

        public override bool IsCaptionVisible => false;

        protected override object CreateControlCore()
        {
            var myButton = PropertyValue as MyButton;
            var control = new MyButtonControl();
            control.SetButtonPressed(myButton.ButtonClicked);
            control.simpleButton1.Text = myButton.Text;
            control.simpleButton1.ToolTip = myButton.ToolTip;
            return control;
        }
}
Then for the class
   public class MyButton
    {
        public string Text { get; set; }
        public Action ButtonClicked { get; set; }
        public string ToolTip { get; set; }
    }
Now the tricky bit, a holder for MyButton.
This is where the event code goes.
public class HeadPartMyButton
{
public HeadPartMyButton(HeadRHSResult headRhsResult)
{
Parent = headRhsResult;
MyButton = new MyButton
{
ButtonClicked = ThisAction,
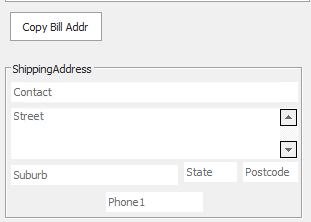
Text = "Copy Bill Addr",
ToolTip = "Copy billing address to shipping address"
};
}
[Browsable(false)] public HeadRHSResult Parent { get; set; }
[VisibleInDetailView(true)]
[Aggregated]
public MyButton MyButton { get; set; }
private void ThisAction()
{
var h = Parent.HeadExt;
Parent.HeadExt.ShippingAddress = new Address2
{
Street = h.BillToAddress,
Suburb = h.BillToCity,
State = h.BillToState,
Postcode = h.BillToPostcode,
Phone1 = h.Phone,
Company = h.Customer
};
h.RefreshShippingAddress();
}
}
Now set up the holder as a property of the business object.
(Todo: Add this code)
Note the business object has some code that gets called by the Holder to refresh the display.
        public void RefreshShippingAddress()
        {
            OnPropertyChanged("ShippingAddress");
        }
Now include the property in the layout
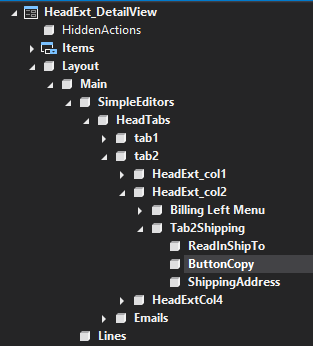
Here is how it looks